• Skip to main content
  • Skip to primary sidebar
  • Skip to footer

Sage Baking

Pinch of Yum’s General Tso’s Cauliflower

December 8, 2016 by Bjork 5 Comments

Okay, maybe I’m out of line. I admit to the food-blogger cauliflower-loving weirdness today.

But guys. BE RATIONAL for two seconds, puhhlease. Obviously weird and delicious are not mutually exclusive, which means PARTY IN YOUR MOUTH! With General Tso’s Cauliflower!

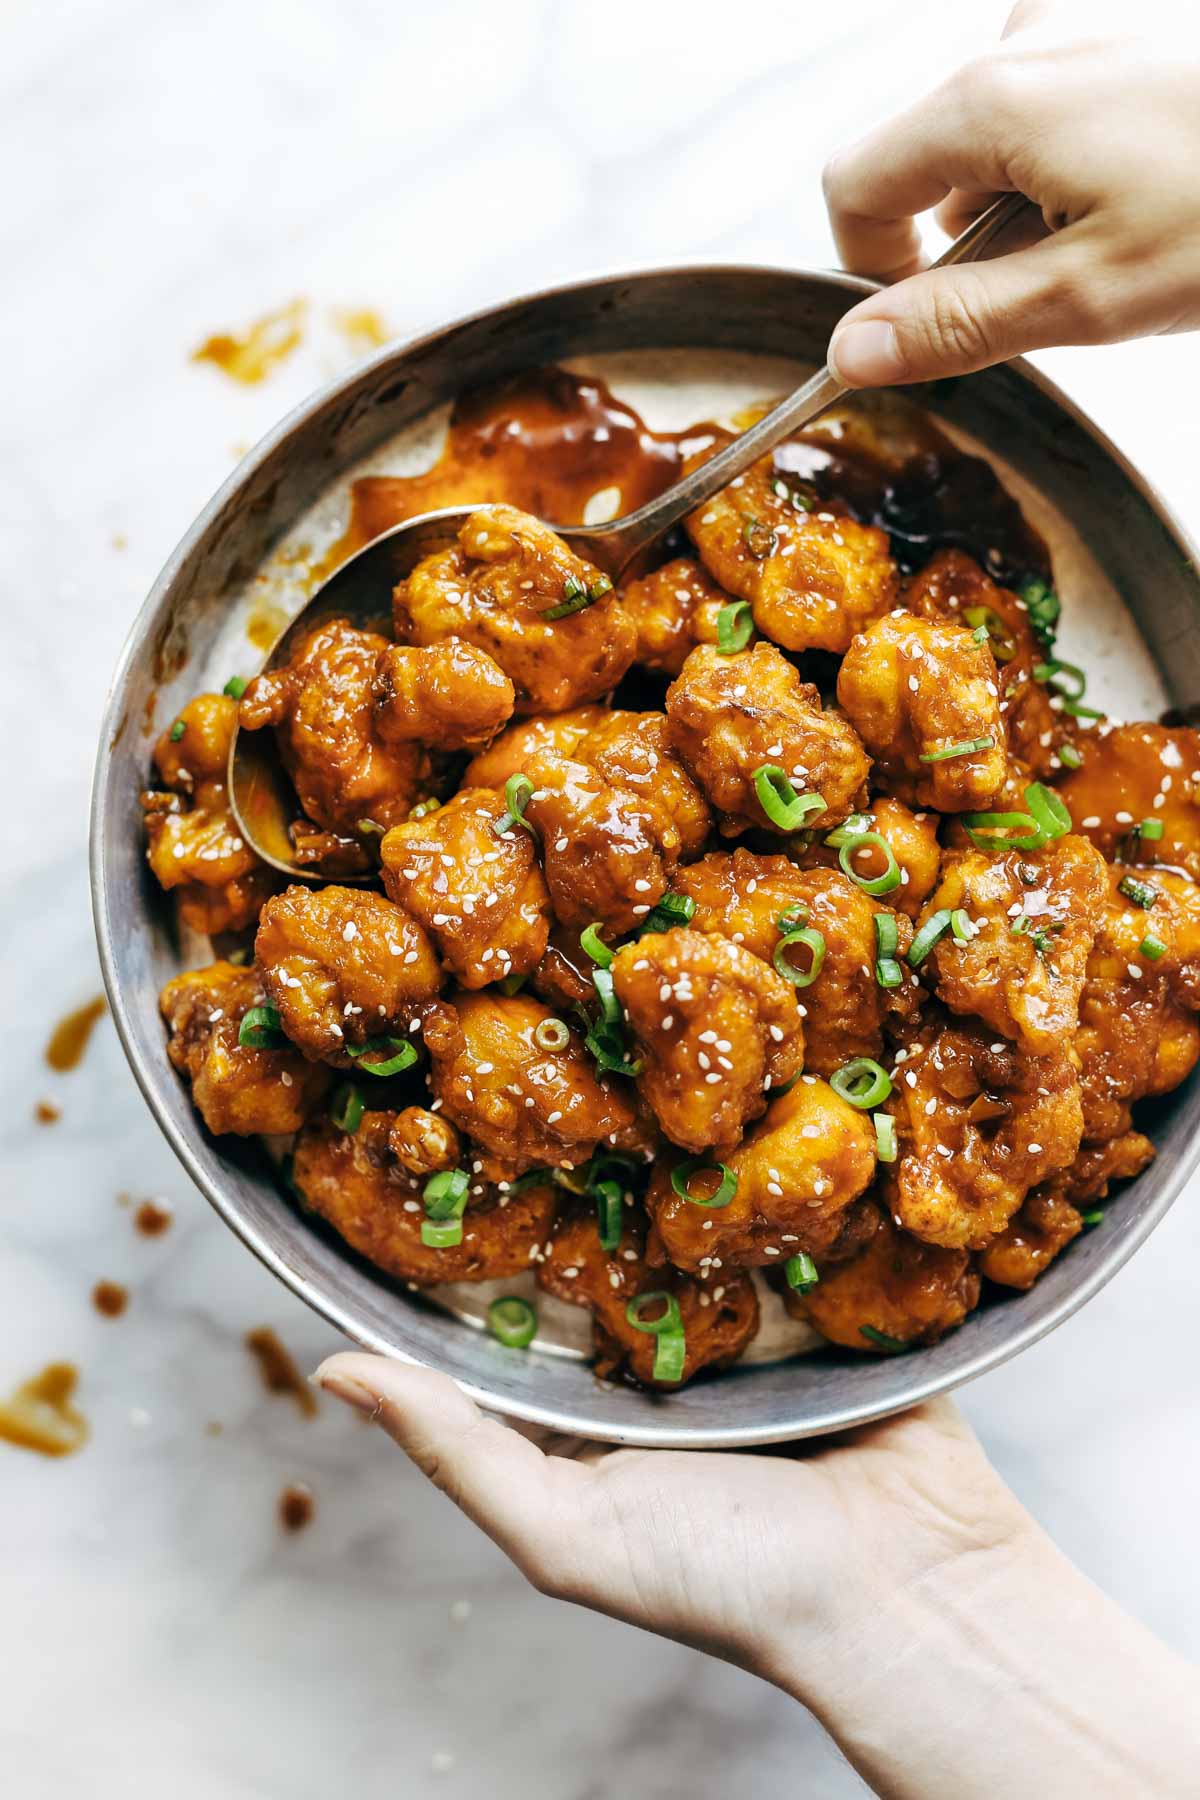
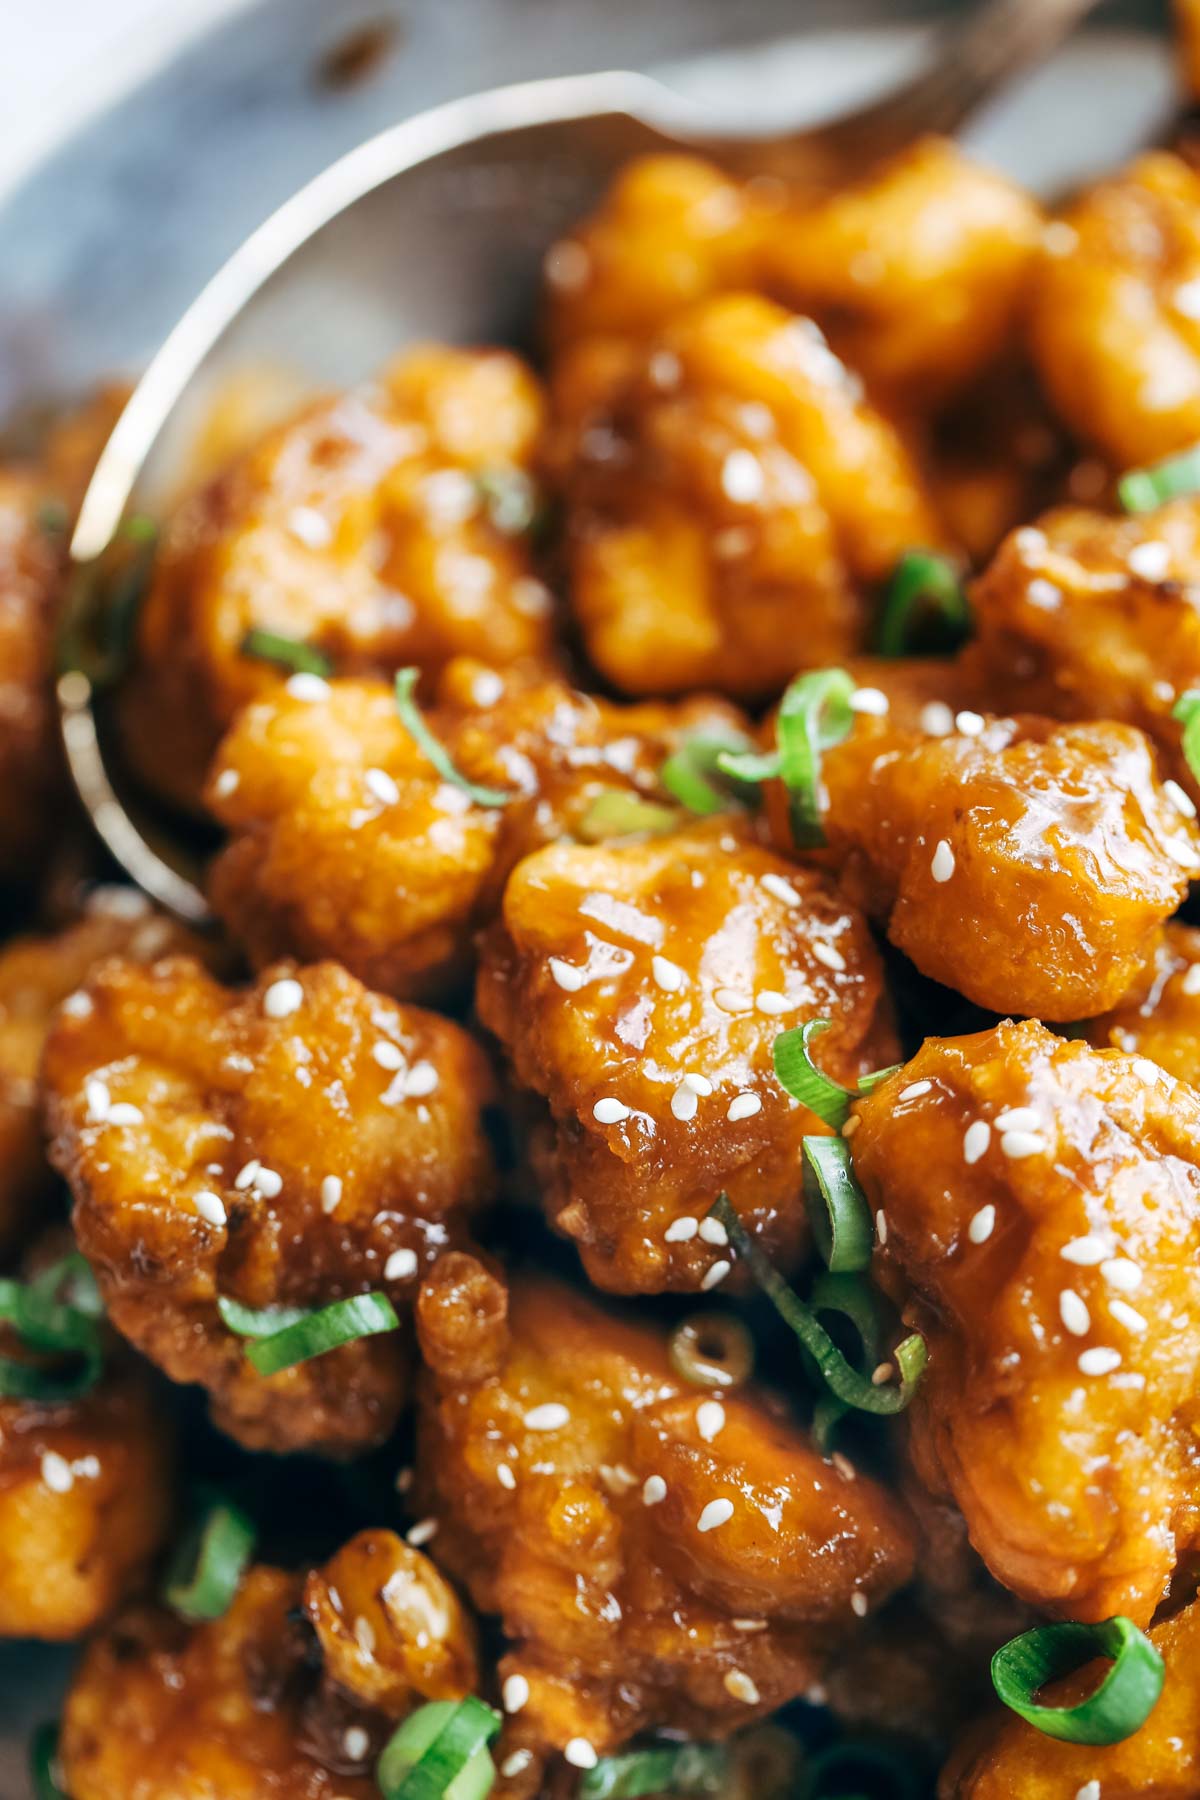
I mean, think about what this recipe means. It means you’re going to fry up some golden brown fried bits of cauliflower and coat them in a luscious sweet and spicy sauce. Ummmmright? It is the definition of BOTH weird and delicious. Weirdlicious? No. I’m sorry. We crossed a line there.

Just delete everything except part about the delicious party in your mouth. THAT is THIS.


Print
clock clock iconcutlery cutlery iconflag flag iconfolder folder iconinstagram instagram iconpinterest pinterest iconfacebook facebook iconprint print iconsquares squares iconheart heart iconheart solid heart solid icon

General Tso’s Cauliflower

★★★★★

5 from 3 reviews

Print Recipe
Save Recipe Recipe Saved

This is the best General Tso’s-style cauliflower!

  • Total Time: 50 minutes
  • Yield: 4 servings 1x

Ingredients

Units Scale

For the General Tso’s Sauce:

  • 1 tablespoon sesame oil
  • 3 cloves garlic, minced
  • 1 knob of ginger, grated
  • 1/2 cup chicken or vegetable broth
  • 1/2 cup soy sauce
  • 1/3 cup rice vinegar
  • 1/4 cup sugar (more to taste)
  • 2 tablespoons tomato paste
  • 2 tablespoons cornstarch

For the Batter:

  • 1 cup flour
  • 2/3 cup cornstarch
  • 1 1/2 teaspoons baking powder
  • 2 teaspoons salt
  • 4 eggs
  • water as needed (about 1/2 cup)

Instructions

General Tso’s Sauce:

  1. Heat the sesame oil in a small saucepan over medium low heat. Add the ginger and garlic and stir fry for a minute or two. Add remaining ingredients and whisk to combine. Bring to a low boil; simmer for another 20-30 minutes or until sauce is thickened. Add more sweetness, citrus, etc. to your taste.
  2. Cauliflower Batter: Whisk all the batter ingredients until a loose batter forms. The batter should be thick enough to cling to the cauliflower and cover it but stay loose enough to easily drip off (adjust thickness with water).
  3. Cauliflower Frying: Pour oil into a heavy bottomed skillet to make it deep enough so it will cover the cauliflower about halfway (probably ends up being a few cups). Heat the oil over medium heat. Drop a small bit of batter in the oil to test it – when it rises to the top and bubbles, the oil is ready. Dip cauliflower florets in the batter and let the excess drip off before gently setting in the oil. Fry for a few minutes on each side, then flip, repeating sides several times if necessary until you get a nice golden brown fried exterior. The additional frying time helps make it a little crunchier, which I very much like. 🙂 Remove and set on a cooling rack with paper towels underneath (again, rather than putting it all on a plate or bowl with paper towels, this keeps it crispy vs. soggy).
  4. Serving: Toss the fried cauliflower with the sauce (enough just to cover) and sprinkle with scallions and sesame seeds for serving. Serve with rice.

Notes

  • We tried this with sautéed (not battered and fried) cauliflower and it worked but wasn’t nearly as good.
  • Author: Lindsay Ostrom
  • Prep Time: 25 mins
  • Cook Time: 25 mins
  • Category: Dinner
  • Cuisine: Asian / American

Nutrition

  • Serving Size: 1 cup
  • Calories: 400
  • Sugar: 6g

Love this recipe?

Share a photo and tag us on Instagram (@sagebaking) — we can't wait to see what you've made!

Filed Under: Uncategorized

Thai Noodle Salad

December 8, 2016 by Bjork Leave a Comment

thai-salad-3

Annnnnd we are back on track!

Er, okay, getting there, at least. With the help of this friendly little Thai Noodle Salad and its packed-in veggies, protein, healthy fats, and major flavor, I am doing some post-girls’-trip resetting to get back to the norm of solid healthy eating. And by “norm”, I mean the first time in a few months thanks to all that first trimester craziness. Just let me pretend.

Our girls’ trip to San Diego this weekend was just… well, it was a lot of different things. Mostly it was really nice to get away from Facebook and CNN and NPR radio news for a few days, and to have 4-hour extended happy hour sessions and watch seals flopping in and out of the ocean and pop in for a little ice cream at 11am because it’s California and WHY NOT. We soaked up the sun and the ocean, we had pizza delivered to our room for a midnight snack, and we reconnected over slow meals in sweet, hard, and meaningful ways.

I’ll tell you more about it later this week – I have just a few pictures to share. ? And I want to talk more in depth about everything that’s going on right now, because is it just me? Or does it feel like things are kinda heavy? I am still mentally working out how to even talk about it.

But for today, I’m just giving my food life to you in real-time. I got home from the trip on Sunday night, did a reset on Monday including a speedy fast trip to the grocery store, and found myself yesterday chopping like a ninja and then devouring this salad as a “detox” back into normal person eating.

Print
clock clock iconcutlery cutlery iconflag flag iconfolder folder iconinstagram instagram iconpinterest pinterest iconfacebook facebook iconprint print iconsquares squares iconheart heart iconheart solid heart solid icon

Thai Noodle Salad

★ 5 Stars ☆ ★ 4 Stars ☆ ★ 3 Stars ☆ ★ 2 Stars ☆ ★ 1 Star ☆

No reviews

Print Recipe
Save Recipe Recipe Saved

This Thai Noodle Salad is a quick and tasty meal that is perfect for a weeknight. Full of crunchy vegetables and vibrant Thai flavors, it is sure to please!

  • Total Time: 45 minutes
  • Yield: 4 servings 1x

Ingredients

Units Scale

for the dressing:

  • 1/2 cup canola oil
  • 2 large cloves garlic, peeled
  • 1/3 cup low sodium soy sauce
  • 1/4 cup white distilled vinegar
  • 2 tablespoons water
  • 2 tablespoons honey
  • 2 tablespoons sesame oil
  • 1 tablespoon lemongrass or ginger paste
  • a couple BIG squeezes of lime juice (to taste)
  • 1/4 cup peanut butter

for the salad:

  • 4 ounces brown rice noodles (regular rice noodles are fine, too)
  • 1 lb. boneless skinless chicken breasts
  • 5–6 cups baby kale or spinach
  • 3 large carrots, cut into small, thin pieces*
  • 3 bell peppers, cut into small, thin pieces*
  • 1 cup packed cilantro leaves, chopped
  • 4 green onions, green parts only, chopped
  • 1/2 cup cashews or peanuts

Instructions

  1. PREP: Start soaking the rice noodles in a bowl of cold water. Preheat the oven to 400 degrees.
  2. DRESSING: Pulse all the dressing ingredients in a food processor EXCEPT peanut butter. Place the chicken in a plastic bag and use about ¼ to ½ cup of the dressing (without peanut butter) to marinate the chicken in the fridge for about 15-30 minutes. Add the peanut butter to the dressing in the food processor; pulse, then taste and adjust. Set aside.
  3. VEGGIES: Prep all your veggies and toss together in a bowl.
  4. CHICKEN: Bake the marinated chicken for 15-20 minutes. Rest for 5-10 minutes, then cut and add to the veggies.
  5. NOODLES: Drain the noodles (they should be softened at this point). Finish cooking them in a skillet over medium high heat. Add a little oil and a little dressing and toss them around until they are soft and pliable (if you need to add a little water to soften them, that works, too).
  6. ASSEMBLY: Toss stir-fried noodles with the chicken and veggie mixture. Serve hot or cold. Top with extra peanuts and cilantro (and dressing, and lime juice, and sesame seeds, and…)

Notes

You can cut the carrots and peppers however you like, really. But I like to cut them so they sort of match the shape and texture of the noodles. A spiralizer, peeler, or mandoline are my favorite tools for this.

  • Author: Lindsay Ostrom
  • Prep Time: 25 mins
  • Cook Time: 20 mins

Nutrition

  • Serving Size: 1 cup
  • Calories: 400
  • Sugar: 3 g
  • Sodium: 400mg
  • Fat: 8g
  • Carbohydrates: 12g
  • Protein: 10g

Love this recipe?

Share a photo and tag us on Instagram (@sagebaking) — we can't wait to see what you've made!


Filed Under: Lunch, Recipes

Thai Noodle Salad with Peanut Lime Dressing

December 8, 2016 by Bjork 1 Comment

thai-salad-3

Annnnnd we are back on track!

Er, okay, getting there, at least. With the help of this friendly little Thai Noodle Salad and its packed-in veggies, protein, healthy fats, and major flavor, I am doing some post-girls’-trip resetting to get back to the norm of solid healthy eating. And by “norm”, I mean the first time in a few months thanks to all that first trimester craziness. Just let me pretend.

Our girls’ trip to San Diego this weekend was just… well, it was a lot of different things. Mostly it was really nice to get away from Facebook and CNN and NPR radio news for a few days, and to have 4-hour extended happy hour sessions and watch seals flopping in and out of the ocean and pop in for a little ice cream at 11am because it’s California and WHY NOT. We soaked up the sun and the ocean, we had pizza delivered to our room for a midnight snack, and we reconnected over slow meals in sweet, hard, and meaningful ways.

I’ll tell you more about it later this week – I have just a few pictures to share. ? And I want to talk more in depth about everything that’s going on right now, because is it just me? Or does it feel like things are kinda heavy? I am still mentally working out how to even talk about it.

But for today, I’m just giving my food life to you in real-time. I got home from the trip on Sunday night, did a reset on Monday including a speedy fast trip to the grocery store, and found myself yesterday chopping like a ninja and then devouring this salad as a “detox” back into normal person eating.

Print
clock clock iconcutlery cutlery iconflag flag iconfolder folder iconinstagram instagram iconpinterest pinterest iconfacebook facebook iconprint print iconsquares squares iconheart heart iconheart solid heart solid icon

Thai Noodle Salad with Peanut Lime Dressing

★★★★★

5 from 1 review

Print Recipe
Save Recipe Recipe Saved
  • Total Time: 45 minutes
  • Yield: 4 servings 1x

Ingredients

Units Scale

For the dressing:

  • 1/2 cup canola oil
  • 2 large cloves garlic, peeled
  • 1/3 cup low sodium soy sauce
  • 1/4 cup white distilled vinegar
  • 2 tablespoons water
  • 2 tablespoons honey
  • 2 tablespoons sesame oil
  • 1 tablespoon lemongrass or ginger paste
  • a couple BIG squeezes of lime juice (to taste)
  • 1/4 cup peanut butter

For the salad:

  • 4 ounces brown rice noodles (regular rice noodles are fine, too)
  • 1 lb. boneless skinless chicken breasts
  • 5–6 cups baby kale or spinach
  • 3 large carrots, cut into small, thin pieces*
  • 3 bell peppers, cut into small, thin pieces*
  • 1 cup packed cilantro leaves, chopped
  • 4 green onions, green parts only, chopped
  • 1/2 cup cashews or peanuts

Instructions

  1. PREP: Start soaking the rice noodles in a bowl of cold water. Preheat the oven to 400 degrees.
  2. DRESSING: Pulse all the dressing ingredients in a food processor EXCEPT peanut butter. Place the chicken in a plastic bag and use about ¼ to ½ cup of the dressing (without peanut butter) to marinate the chicken in the fridge for about 15-30 minutes. Add the peanut butter to the dressing in the food processor; pulse, then taste and adjust. Set aside.
  3. VEGGIES: Prep all your veggies and toss together in a bowl.
  4. CHICKEN: Bake the marinated chicken for 15-20 minutes. Rest for 5-10 minutes, then cut and add to the veggies.
  5. NOODLES: Drain the noodles (they should be softened at this point). Finish cooking them in a skillet over medium high heat. Add a little oil and a little dressing and toss them around until they are soft and pliable (if you need to add a little water to soften them, that works, too).
  6. ASSEMBLY: Toss stir-fried noodles with the chicken and veggie mixture. Serve hot or cold. Top with extra peanuts and cilantro (and dressing, and lime juice, and sesame seeds, and…)

Notes

*You can cut the carrots and peppers however you like, really. But I like to cut them so they sort of match the shape and texture of the noodles. A spiralizer, peeler, or mandoline are my favorite tools for this.

  • Author: Lindsay Ostrom
  • Prep Time: 25 mins
  • Cook Time: 20 mins
  • Category: Dinner
  • Cuisine: Thai

Love this recipe?

Share a photo and tag us on Instagram (@sagebaking) — we can't wait to see what you've made!


Filed Under: Recipes

How I Grew My Blog with Food Blogger Pro!

May 16, 2016 by Bjork Leave a Comment

The article below is a fictional example of an affiliate post. We encourage you to use it as inspiration, but be sure to use your own experiences and words when writing your own. This post includes active affiliate links for illustration purposes only. 

fbp-affiliate-sample-post

I have a confession to make. When I started my food blog, it was a mess. I had great recipes, but I wasn’t getting any traffic. I was treating my blog like a hobby without any strategy. After a couple of frustrating months of low traffic and low engagement from readers, I decided to get serious. I knew bloggers were making money, but I had no idea how.

I spent a lot of time researching blogging techniques, but I found myself totally overwhelmed. Information overload is real! I had so many questions, but I didn’t know who to ask. Imagine my relief when I found Food Blogger Pro! I was so happy to find a website that covered all the fundamental principles I needed to grow my blog.

What is Food Blogger Pro?

Food Blogger Pro is an awesome website that teaches you how to start, grow and monetize your blog. It was founded by Lindsay and Bjork Ostrom, the couple behind the very successful food blog Pinch Of Yum.

Food Blogger Pro has over 300, easy to follow tutorial videos and a very active community forum. The videos make it super easy to learn technical skills and apply them to your blog. The community is a great place to get individual attention from industry experts and other bloggers.

What did I learn?

I worked my way through the site systematically using their course tracker. This helped me know which areas to focus on. There were some things I could skip because I had already started my blog, but they do cover everything from the very beginning.

These are some of the key things I learned that really helped me move my blogging career forward:

  • How to build traffic using social media, food sharing sites and Search Engine Optimization.
  • How to create popular recipe videos using my phone as well as a DSLR
  • How to take drool-worthy photos in natural or artificial light.
  • How to edit my photos using Photoshop and Lightroom.
  • How to monetize my site using ad networks and affiliate partnerships.
  • How to use plugins to improve my blog and add functionality to my site.
  • How to create an e-book and sell it online.
  • How to use social media and email marketing to improve my traffic and engagement.

Learning all this was not the only benefit of joining Food Blogger Pro. I also made friends and connected with a bunch of amazing bloggers and industry experts in the community forums. If I’m ever stuck pulling my hair out over a technical problem on my blog, I can pop in the forums and someone will have some advice for me. How great is that? Bloggers helping bloggers!

So, is it worth it?

Absolutely! In my opinion Food Blogger Pro is one of the best investments a blogger can make when they are getting started. Think of it as rocket fuel for your blog. If you watch the courses and follow the steps, you will see results. You won’t have to waste time digging through all the random information online. It’s sooooooo worth it!

I’m interested, how do I sign up?

Signing up is super easy. Visit this link and select a monthly or yearly membership: Sign up for Food Blogger Pro

Bonus! If you purchase a yearly membership you get a free year of Nurtifox. Nutrifox is a tool that allows you to create and share nutrition labels in your recipe posts. 

What are you waiting for?

If you’ve been thinking of starting a blog, or want to take your current blog to the next level, I strongly suggest you give Food Blogger Pro a try. It’s a wonderful resource and community.

One more thing…

Food Blogger Pro has an awesome weekly podcast that you can listen to for free. It helps me keep my blogging skills sharp. Be sure to check it out here.

– Jasmine

Filed Under: Uncategorized

Roasted Veggie Pitas

February 4, 2016 by Bjork Leave a Comment

spiced-chickpea-vegetable-pita-wraps-recipe-4115

These pita sandwiches are stuffed with roasted veggies, spicy chickpeas, and a cilantro & cayenne tahini dressing. Perfect for lunch or dinner, and they make great leftovers!

Filed Under: Uncategorized

Five Minute Cashew Sauce

August 10, 2015 by Bjork 1 Comment

5 Minute Cashew Sauce - just four easy ingredients: cashews, garlic, salt, and water! Perfect base sauce recipe for pasta, dips, or cheesy sauce alternatives. Vegan. | pinchofyum.com

This is my first sentence.

…

Read More

Filed Under: Five Minute Meals

My 2nd Very Basic Post

July 28, 2015 by Bjork 2 Comments


How about this cool text?

But few of any sort, and none of name….

Read More

Filed Under: Practice Post

My Very Basic Post

July 28, 2015 by Bjork 32 Comments

I learn in this letter that Don Peter of Arragon comes this night to Messina.

He is very near by this: he was not three leagues off

How many gentlemen have you lost in this action?

But few of any sort, and none of name….

Read More

Filed Under: Breakfast

Leek & Artichoke Quiche Test

April 4, 2015 by Bjork 2 Comments

Print

clock clock iconcutlery cutlery iconflag flag iconfolder folder iconinstagram instagram iconpinterest pinterest iconfacebook facebook iconprint print iconsquares squares iconheart heart iconheart solid heart solid icon

Leek & Artichoke Quiche

★★★★★

5 from 1 review

Print Recipe
Save Recipe Recipe Saved

Ingredients

Love this recipe?

Share a photo and tag us on Instagram (@sagebaking) — we can't wait to see what you've made!


Filed Under: Uncategorized

The BEST Strawberry Frosting

February 15, 2015 by Bjork 1 Comment

Print

clock clock iconcutlery cutlery iconflag flag iconfolder folder iconinstagram instagram iconpinterest pinterest iconfacebook facebook iconprint print iconsquares squares iconheart heart iconheart solid heart solid icon

The BEST Strawberry Frosting

★★★★★

5 from 1 review

Print Recipe
Save Recipe Recipe Saved

The best strawberry frosting.

Ingredients

Units Scale
  • 1 cup (10-12g) freeze-dried strawberries
  • 1 cup (235g) unsalted butter, softened to room temperature
  • 4 cups (480g) confectioners’ sugar
  • 3 Tablespoons (45ml) heavy cream
  • 1 teaspoon vanilla extract
  • salt, to taste

Instructions

  1. Using a blender or food processor, process the freeze-dried strawberries into a powdery crumb. You should have around 1/2 cup. Set aside.
  2. In a large bowl using a handheld or stand mixer fitted with a paddle or whisk attachment, beat the butter on medium-high speed until creamy, about 2 minutes. Add confectioners’ sugar, strawberry powder, cream, and vanilla. Beat on low speed for 30 seconds, then switch to high speed and beat for 2 minutes. Taste. Add a pinch of salt if frosting is too sweet.
  3. Cover and store leftover frosting for up to 5 days in the refrigerator.

Love this recipe?

Share a photo and tag us on Instagram (@sagebaking) — we can't wait to see what you've made!


Filed Under: Uncategorized

  • « Go to Previous Page
  • Go to page 1
  • Interim pages omitted …
  • Go to page 4
  • Go to page 5
  • Go to page 6
  • Go to page 7
  • Go to Next Page »

Primary Sidebar

Recent Posts

  • 5 Ingredient Green Curry
  • Ooey, Gooey Chocolate Chip Cookies
  • gooey cinnamon rolls
  • Tasty Sourdough Bread
  • NF Shortcode

Subscribe to email updates!

[mc4wp_form id=”1125″]

Footer

Privacy Policy

Copyright © 2025 Sage Baking on the Foodie Pro Theme